How to build Arduino sketches with Arduino CLI?
Do you know that you don’t actually need the Arduino IDE to build and upload sketches?
Arduino projects can be compiled and uploaded straight from the command line using the Arduino Command Line Interface (CLI).
Underneath, this process is identical to what happens when you build and upload from the IDE,
because Arduino IDE 2.0 and later use arduino-cli under the hood.
The only difference is how do you trigger build and upload — by command line instead of clicking inside IDE.
Working directly with the CLI, without IDE as a middle layer, is actually better for many reasons, which we will discuss below.
Reasons to use Arduino CLI
If you are comfortable using IDE, you may not immediately see why would you use Arduino CLI instead. At first, it may seem more complicated, right? Nothing is as easy as pressing a button. That’s true — Arduino IDE is great for getting started. But as your project grows, and you want to make more complicated things with it, Arduino CLI will allow you to achieve much more.
Some of the benefits are:
-
Advanced configuration
Using custom build or configuration options is not possible from the Arduino IDE. Setting things like custom defines, special compilation flags, or customizing where
buildartifacts are stored, requires modifying configuration files that are outside the IDE. Global configuration files affect all projects, while maintaining per-project config files would be time-consuming. That’s why when your project starts requiring any non-standard setup it’s better to switch to Arduino CLI for simplicity and convenience. -
Automation and CI/CD
With command line interface, you can create CI/CD pipelines that will automatically build, deploy and test the project.
-
Reproducibility
When working in a team, using the Arduino CLI ensures that everyone builds the project with exactly the same setup and dependencies. This helps eliminate the classic “it works on my machine” problem and makes builds consistent across different environments.
-
Independency from Arduino IDE
You don’t have to use Arduino IDE to develop your projects. With the CLI, you can use your favorite code editor.
-
Dependency control
In Arduino IDE, only one version of a library can be installed at the same time. This becomes a real problem when you work on multiple projects that require different versions of the same library. This issue is solved when using CLI — you can specify library versions directly from the command line, ensuring each one uses the correct dependencies.

In summary, using Arduino CLI instead of Arduino IDE gives a lot of new potential to improve your workflow with the project.
Alright, it’s time to get our hands dirty. We’ll install the Arduino CLI, set it up, and then build the project from the command line.
Arduino CLI setup
If you already have
arduino-cliinstalled and working, you can jump to Basic usage chapter.
As of October 2025, the latest version is Arduino CLI 1.3.1, which I’ll be using here.
Please refer to official installation guide to install Arduino CLI on your system.
Installing Arduino CLI
On Ubuntu, I have installed Arduino CLI with one single command:
curl -fsSL https://raw.githubusercontent.com/arduino/arduino-cli/master/install.sh | shOther way, or if you have issues with above command, you can download a prebuilt binary from the Download section, and manually add it to your PATH.
⚠️ Avoid installing arduino-cli with snap.
The Snap package is not officially supported. It often causes permission and path issues (for example, this one
— it happened to me when I used snap on Ubuntu 24.04).
If you’ve already installed it with snap and it’s not working, remove it and reinstall using one of the methods above.
Check installation
After installing, type arduino-cli in your terminal, to confirm that the tool was installed successfully.
$ arduino-cli
Arduino Command Line Interface (arduino-cli).

Usage:
  arduino-cli [command]
  ...
Additionally, check if boards discovery works well:
$ arduino-cli board list
Port       Protocol Type        Board Name FQBN Core
/dev/ttyS4 serial   Serial Port Unknown
All good on my side!
Setup your board core
After Arduino CLI is installed, you need to install needed boards definitions [1]. First, let’s update the board index:
arduino-cli core update-indexThen you need to install the core relevant for your board. Right now, we don’t know which core id we need, so let’s see what we can choose:
$ arduino-cli core search
Downloading index: package_index.tar.bz2 downloaded
ID                       Version          Name
arduino:avr              1.8.6            Arduino AVR Boards
arduino:esp32            2.0.18-arduino.5 Arduino ESP32 Boards
arduino:megaavr          1.8.8            Arduino megaAVR Boards
arduino:nrf52            1.0.2            Arduino nRF52 Boards
arduino:renesas_uno      1.5.1            Arduino UNO R4 Boards
arduino:sam              1.6.12           Arduino SAM Boards (32-bits ARM Cortex-M3)
...
I have Arduino Uno R4 WiFi, so I need to use arduino:renesas_uno id.
I will install it with following command:
arduino-cli core install arduino:renesas_unoThe preparations are done! It was easy, wasn’t it?
Basic usage
To start using Arduino CLI, you actually just need to use three basic commands:
- create new sketch,
- build a sketch,
- upload the binary to the board.
Creating a new sketch
You can create new sketch with the arduino-cli sketch new command:
$ arduino-cli sketch new MyBlink
Sketch created in: /home/kate/Arduino/MyBlink
By default, the sketches are created inside current working directory, so remember to change directory to where you want to store your sketch.
Compile a sketch
To compile a sketch, use arduino-cli compile command followed by:
--fqbn <id>— your board id (mandatory),<sketch root dir>— the path to root directory of the sketch to compile (mandatory, unless you’re inside the sketches root dir),--verbose— verbose flag to print all build logs to console (if you want it).
I can compile MyBlink sketch with following command:
arduino-cli compile --fqbn arduino:renesas_uno:unor4wifi --verbose /home/kate/Arduino/MyBlinkUploading a sketch
The command for uploading a sketch looks as follows:
arduino-cli upload -p <port> --fqbn <id> --verbose <sketch_dir>Board id and sketch dir are clear, but we need to know to which port is the board connected. How can we check it?
Simply use arduino-cli board list command:
$ arduino-cli board list
Port         Protocol Type              Board Name          FQBN                          Core
/dev/ttyACM0 serial   Serial Port (USB) Arduino UNO R4 WiFi arduino:renesas_uno:unor4wifi arduino:renesas_uno
There is only one board connected to the port /dev/ttyACM0.
So, the upload command looks like this:
arduino-cli upload -p /dev/ttyACM0 --fqbn arduino:renesas_uno:unor4wifi --verbose /home/kate/Arduino/MyBlinkIt was basically all needed to replace the usage of Arduino IDE Verify/Compile and Upload actions.
Serial monitor
If your application sends data using Serial.write() or Serial.print(),
you can view it using the monitor command in the Arduino CLI.
Make sure the baud rate in your monitor command matches the one you set in your sketch. For example, if your code includes:
Serial.begin(115200);then you should start the monitor with the same baud rate:
arduino-cli monitor -p /dev/ttyACM0 --config 115200Using serial prints is one of the simplest ways to debug your Arduino applications.
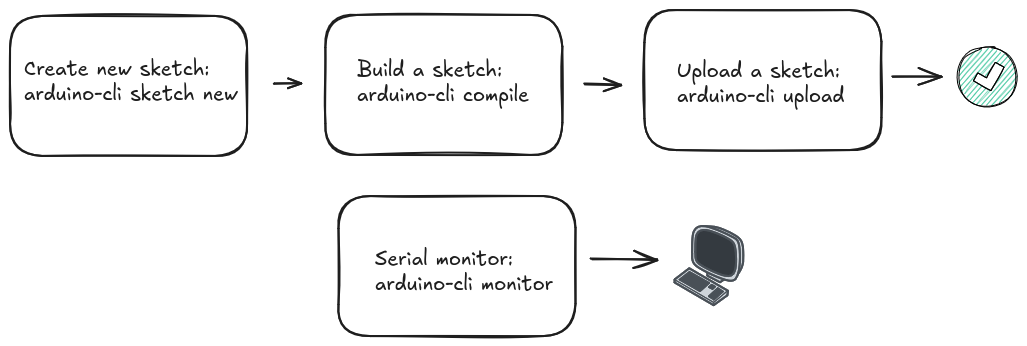
Basic flow
In summary, the basic arduino-cli workflow is as follows:
Advanced usage
When you’re comfortable with basic usage, we can try to do more with CLI.
Specify build folder
By default, Arduino CLI places build artifacts in a hidden, temporary folder — which can make it hard to inspect.
To keep your build outputs organized and easy to analyze, specify a custom build folder using the --build-path flag:
$ arduino-cli compile \
  /home/kate/Arduino/MyBlink \
  --fqbn arduino:renesas_uno:unor4wifi \
  --verbose  \
  --build-path /home/kate/Arduino/MyBlink/build
Now, all generated files are stored in the build/ directory within your project:
~/Arduino/MyBlink/build$ tree -L 1
.
├── build.options.json
├── compile_commands.json
├── core
├── includes.cache
├── libraries
├── libraries.cache
├── MyBlink.ino.bin
├── MyBlink.ino.elf
├── MyBlink.ino.hex
├── MyBlink.ino.map
└── sketch

4 directories, 8 files
This layout makes it much easier to explore build files, inspect compilation issues, or integrate the build with external tools (like static analyzers).
Optimize for debug
The --optimize-for-debug flag adjusts compilation settings to make debugging easier.
You can check its behavior in the platform.txt file.
When --optimize-for-debug is enabled,
the debug version of the optimization flags is applied;
otherwise, the release version is used by default.
You can edit these flags in platform.txt to customize how each mode behaves.
compiler.optimization_flags.release=-Os
compiler.optimization_flags.debug=-Og -g
It’s good idea to store build files for debug and release version in separate build folders,
using already discussed --build-path:
arduino-cli compile --fqbn arduino:renesas_uno:unor4wifi \
  --verbose  /home/kate/Arduino/MyBlink \
  --build-path /home/kate/Arduino/MyBlink/build/debug \
  --optimize-for-debug

arduino-cli compile --fqbn arduino:renesas_uno:unor4wifi \
  --verbose  /home/kate/Arduino/MyBlink \
  --build-path /home/kate/Arduino/MyBlink/build/release
This way, you have debug optimized version in MyBlink/build/debug, and release version in MyBlink/build/release.
Custom defines
Let’s take a look at the MyBlink sketch. Currently, the LED blinks with a hardcoded delay of 1000 ms.
We can make this configurable at compile time by introducing a custom define called BLINK_FREQUENCY.
First, update the MyBlink sketch to use the new frequency. If no value is provided from the command line, it will default to 1000 ms; otherwise, it will use the value you specify.
#ifndef BLINK_FREQUENCY
#define BLINK_FREQUENCY 1000
#endif

void loop() {
  Serial.write("Blinking");
  digitalWrite(LED_BUILTIN, HIGH);      // turn the LED on (HIGH is the voltage level)
  delay(BLINK_FREQUENCY);               // wait for a BLINK_FREQUENCY ms
  digitalWrite(LED_BUILTIN, LOW);       // turn the LED off by making the voltage LOW
  delay(BLINK_FREQUENCY);               // wait for a BLINK_FREQUENCY ms
}
By adjusting the compile command, you can easily change how fast the LED blinks.
For example, build.extra_flags="-DBLINK_FREQUENCY=100" part below sets the blink frequency to 100 ms:
arduino-cli compile --fqbn arduino:renesas_uno:unor4wifi \
  --build-property build.extra_flags="-DBLINK_FREQUENCY=100" \
  --verbose
Customizing command
The platform.txt file defines the build recipes that are used to compile,
link, and package a sketch. These recipes use variables that we can override when we need custom behavior.
Some of these editable variables are:
# this can be overriden in boards.txt
build.extra_flags=
build.extra_ldflags=

# These can be overridden in platform.local.txt
compiler.c.extra_flags=
compiler.c.elf.extra_flags=
compiler.S.extra_flags=
compiler.cpp.extra_flags=
compiler.ar.extra_flags=
compiler.objcopy.eep.extra_flags=
compiler.elf2hex.extra_flags=
These comments encourage us to override the variables in platform.local.txt or boards.txt,
but when using the CLI there is an easier and cleaner approach:
instead of modifying any files, we can override them directly from the command line using --build-property.
This allows you to change the settings for a specific build only.
For example:
arduino-cli compile --fqbn arduino:renesas_uno:unor4wifi \
  --build-property build.extra_flags="-DBLINK_FREQUENCY=100" \
  --build-property compiler.cpp.extra_flags="-pedantic -Werror" \
  --verbose
Writing a simple Makefile
As our build command becomes longer, it becomes harder to remember and type correctly each time. To make it easier, we can wrap these commands inside a script. This could be a bash script, but an even better option is a Makefile. Creating a Makefile for our Arduino project is very simple.
At the top of the Makefile, we define a few default variables such as FQBN and PORT.
The default values will be used unless you override them in Makefile call.
# FQBN for your board (can be overriden)
FQBN ?= arduino:renesas_uno:unor4wifi

# Serial port (can be overriden)
PORT ?= /dev/ttyACM0

# Build dirs
BUILD_DEBUG := build/debug
BUILD_RELEASE := build/release

# Arduino CLI executable
ARDUINO_CLI := arduino-cli

# Default build release
all: release

debug:
	$(ARDUINO_CLI) compile \
		--fqbn $(FQBN) \
		--build-path $(BUILD_DEBUG) \
		--optimize-for-debug \
		--verbose

release:
	$(ARDUINO_CLI) compile \
		--fqbn $(FQBN) \
		--build-path $(BUILD_RELEASE) \
		--verbose

upload-debug: debug
	$(ARDUINO_CLI) upload \
		-p $(PORT) \
		--fqbn $(FQBN) \
		--input-dir $(BUILD_DEBUG)

upload-release: release
	$(ARDUINO_CLI) upload \
		-p $(PORT) \
		--fqbn $(FQBN) \
		--input-dir $(BUILD_RELEASE)

monitor:
	$(ARDUINO_CLI) monitor -p $(PORT)

clean:
	rm -rf build


.PHONY: all debug release upload-debug upload-release clean monitor
Once the Makefile is in the project root, using it becomes extremely easy. Note that passing FQBN and PORT is only needed if you want to change the default values.
# Build and upload debug
make upload-debug FQBN=arduino:renesas_uno:unor4wifi PORT=/dev/ttyACM0

# Build and upload release (with default FQBN and PORT)
make upload-release

# Open serial monitor
make monitor PORT=/dev/ttyACM0

# Clean builds
make clean
Summary
Using the Arduino CLI gives you full control over the build process,
from compiling to uploading sketches, without relying on the Arduino IDE.
It’s perfect for automation, reproducibility, and integrating Arduino projects into advanced workflows or CI/CD pipelines.
In this post we saw how to use basic commands of Arduino IDE, add some customizations for build setup, and write a simple Makefile
using arduino-cli internally.
MyBlink sketch using Makefile is published here.
More about Arduino CLI
- 📚 Official documentation of Arduino CLI
- 📚 Detailed article showing how to install and integrate CLI with VSCode
- 🎬 Arduino CLI - What and Why? | Breaking Out of Arduino IDE | Part 2 | Magpie Embedded on YouTube
- 🎬 Arduino CLI and the art of command line | Sayanee Basu on YouTube
- 🛠️ Arduino CLI Manager | interactive shell wrapper for Arduino CLI